Forwarding OpenShift Alertmanager Alerts
Introduction
The goal of this article is to present the information necessary to demonstrate forwarding OpenShift Alertmanager (Prometheus) alerts, using Multi-Cluster Observability with Red Hat ACM, to a receiver using a webhook.
Prerequisites
- A Red Hat ACM OpenShift cluster with Multi-Cluster Observability deployed
- A receiver that can ingest the forwarded alerts via a webhook. Here we will be using:
Running Gotify
Most likely you will already have a service in the environment that will ingest the alerts that are forwarded from OpenShift. However, if you are looking to test this functionality in a lab environment you might be looking for a quick and dirty solution to receive the alerts to validate your priorities and custom alert rules. One such option is to use Gotify. Unfortunately, Gotify does not provide an Alertmanager-aware webhook endpoint, and the Alertmanager to Gotify webhook bridge will need to be used.
There are multiple options for deploying Gotify, but the easiest is to simply run the container.
Create a folder to hold the application data
mkdir /data/gotify-data
Run the container
podman run --name gotify --rm -it -p 9080:80 -e TZ="Americas/Denver" -v /data/gotify-data:/gotify-data:Z docker.io/gotify/server:2.7 -storageDataPath=gotify-data
Don’t forget to add a firewall rule (if required)
sudo firewall-cmd --add-port=9080/tcp --zone=public --permanent
sudo firewall-cmd --reload
Use Podlet to generate Podman Quadlet files
There is a great utility called Podlet that will transform a podman run command into the proper syntax for a systemd unit file. You can download the podlet binary or use podman to run it as a container without downloading and installing it:
podman run ghcr.io/containers/podlet --install podman run --name gotify --rm -it -p 9080:80 -e TZ="Americas/Denver" -v /data/gotify-data:/gotify-data:Z docker.io/gotify/server:2.7 -storageDataPath=gotify-data
The output should look something like this:
gotify.container
# server.container
[Container]
ContainerName=gotify
Environment=TZ=Americas/Denver
Exec='-storageDataPath=gotify-data'
Image=docker.io/gotify/server:2.7
PodmanArgs=--interactive --tty
PublishPort=9080:80
Volume=/data/gotify-data:/gotify-data:Z

[Install]
WantedBy=default.target
Save the above output to a file: /usr/share/containers/systemd/gotify.container
Use systemd to control the new service
sudo systemctl daemon-reload
sudo systemctl start gotify.service
sudo systemctl status gotify.service
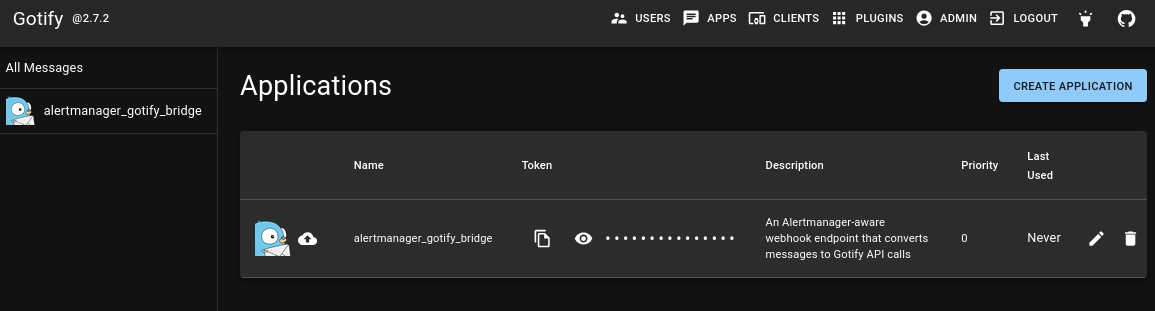
Log in to the Gotify WebUI and create an Application
Log into the Gotify WebUI: http://:9080
Create a new Application and record the TOKEN
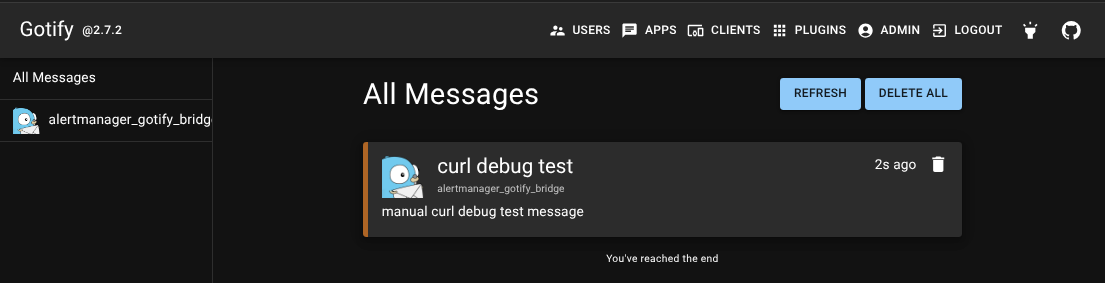
Test Gotify
Run a quick sanity check to ensure that Gotify can receive a message via the newly created application:
curl "http://<host>:9080/message?token=<App Token>" -F "title=curl debug test" -F "message=manual curl debug test message" -F "priority=5"
Running DRuggeri/alertmanager_gotify_bridge
Run the container
podman run --name am_gotify_bridge --rm -it -p 9081:8080 -e GOTIFY_TOKEN=<app_token> -e EXTENDED_DETAILS=true -e GOTIFY_ENDPOINT=http://<host>:9080/message ghcr.io/druggeri/alertmanager_gotify_bridge:2.3
Don’t forget to add a firewall rule (if required)
sudo firewall-cmd --add-port=9081/tcp --zone=public --permanent
sudo firewall-cmd --reload
Use Podlet to generate Podman Quadlet files
Again we are going to use the Podlet utility to transform a podman run command into the proper syntax for a systemd unit file.
podman run ghcr.io/containers/podlet --install podman --name am_gotify_bridge run --rm -it -p 9081:80 -e GOTIFY_TOKEN=<app_token> -e GOTIFY_ENDPOINT=http://<host>:9080/message ghcr.io/druggeri/alertmanager_gotify_bridge:2.3
The output should look something like this:
am_gotify_bridge.container
# am_gotify_bridge.container
[Container]
ContainerName=am_gotify_bridge
Environment=PORT=9081 GOTIFY_TOKEN=<TOKEN> EXTENDED_DETAILS=true GOTIFY_ENDPOINT=http://<host>:9080/message
Image=ghcr.io/druggeri/alertmanager_gotify_bridge:2.3
PodmanArgs=--interactive --tty
PublishPort=9081:9081

[Install]
WantedBy=default.target
Save the above output to a file: /usr/share/containers/systemd/am_gotify_bridge.container
Use systemd to control the new service
sudo systemctl daemon-reload
sudo systemctl start am_gotify_bridge.service
sudo systemctl status am_gotify_bridge.service
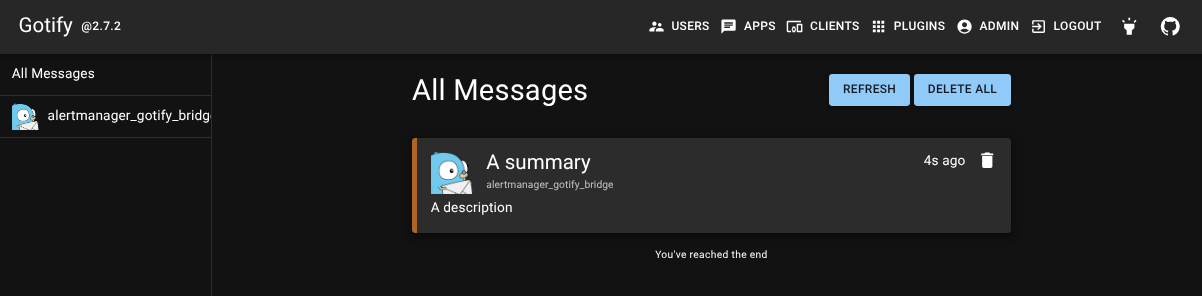
Test the bridge
curl http://127.0.0.1:9081/gotify_webhook -d '
{ "alerts": [
  {
    "annotations": {
      "description":"A description",
      "summary":"A summary",
      "priority":"critical"
    },
    "status": "firing",
    "generatorURL": "http://foobar.com"
  }
]}
'
Configure OpenShift Alertmanager Webhook
The OpenShift platform includes a default and pre-configured monitoring stack with Prometheus and Alertmanager that runs on each cluster. The OpenShift WebUI can be used to configure the Webhook by visiting:
Administration -> Cluster Settings -> Configuration -> Alertmanager
Or by directly editing the alertmanager-main secret in the openshift-monitoring namespace.
In either case, there will be a secret that contains the alertmanager.yaml
content:
alertmanager.yaml
inhibit_rules:
  - equal:
      - namespace
      - alertname
    source_matchers:
      - 'severity="critical"'
    target_matchers:
      - 'severity=~"warning|info"'
  - equal:
      - namespace
      - alertname
    source_matchers:
      - 'severity="warning"'
    target_matchers:
      - 'severity="info"'

receivers:
  # default 'do-nothing' receiver
  - name: "Default"

  # Watchdog receiver
  - name: "Watchdog"
    webhook_configs:
      - url: "http://<host>:9081/gotify_webhook"

  # Critical alerts receiver
  - name: "Critical"
    webhook_configs:
      - url: "http://<host>:9081/gotify_webhook"

route:
  group_by: ["namespace"]
  group_interval: 5m
  group_wait: 30s
  receiver: "Default" # Route unmatched alerts to the default (do-nothing) receiver
  repeat_interval: 12h
  routes:
    # Route - Watchdog
    - receiver: "Watchdog"
      matchers:
        - 'alertname="Watchdog"'
      continue: false

    # Route - Critical alerts
    - receiver: "Critical"
      matchers:
        - 'severity="critical"'
        #- 'severity=~"warning|info"'
      continue: false
Cleanup Old Alerts
Alerts are only useful if they are actionable. As such, old alerts that are no longer firing are not very useful, especially because tracking history is more a function of logging.
The Gotify - Older Notifications cleanup project can be used to remove old alerts from Gotify.